Firebase: Admob in iOS
Firebase is a mobile and web application development platform that can bring to ours application different services and functionality, one of them is “Admob”, providing us tools to place advertisement in our apps giving us the opportunity to earn more money with our apps.
So, now that we know what Firebase is, let’s learn how we can include it in our iOS applications
How can you start to use Firebase?
In the first place before we can use the Authentication service we need to include Firebase in our apps. To do that, follow these steps:
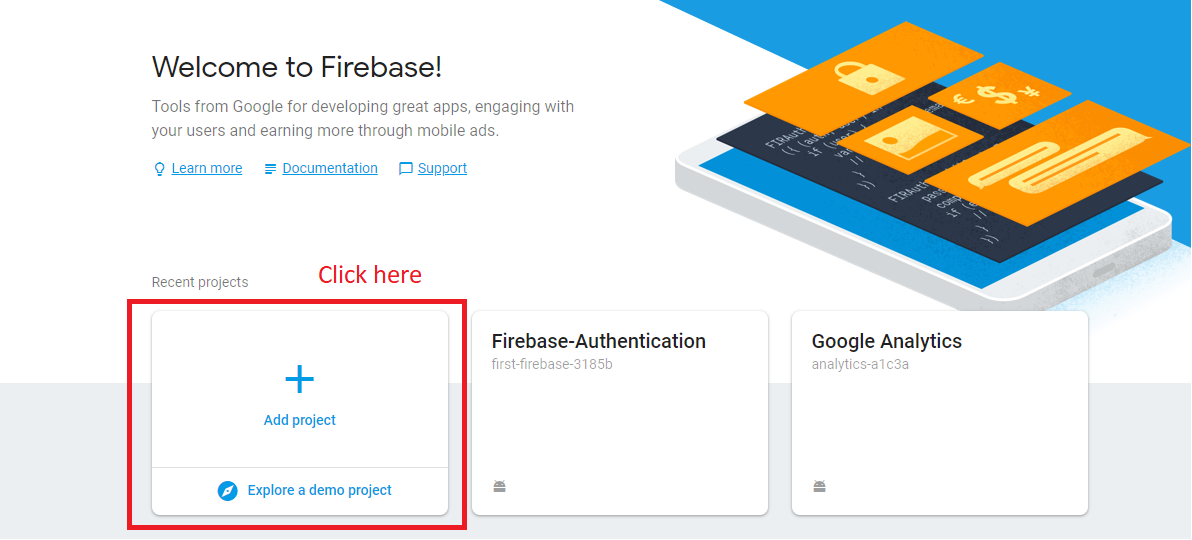
– First we need to get to the Firebase console and once we are there we click on “Add project”.
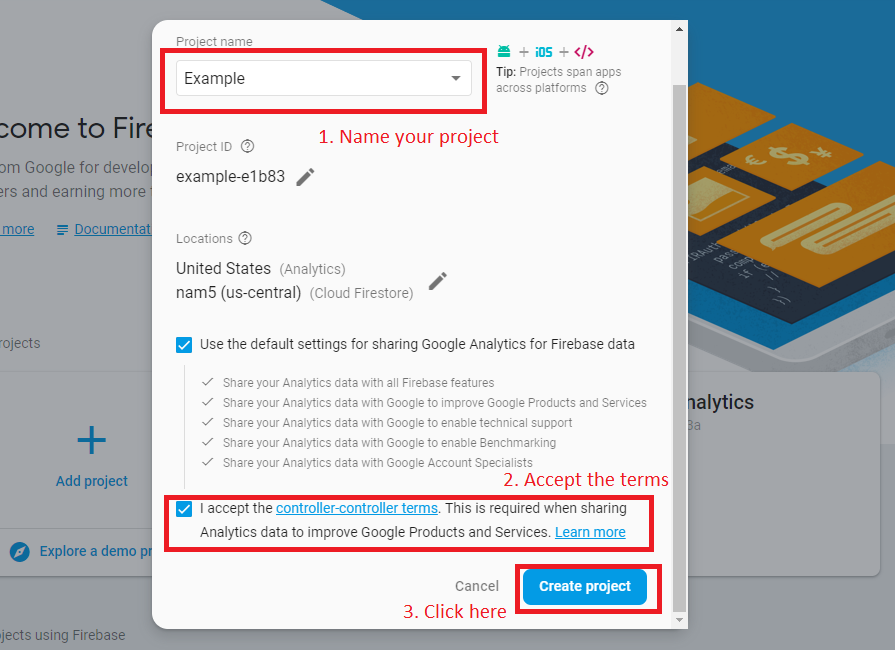
– Fill the following form to create your project.
– After that it will redirect you to your project’s overview page where we will specify the type of application we are creating. Because we are doing an iOS application you can select that option.
– After we click on it, it will give some steps to register our app. In the first will just need to some information about our application.
– For the next step, it will give us a “plist” file which you can download and add to your projects folder in your iOS application.
-The next thing is implement the Firebase object you will use in our app, to do that you have to create a “Podfile” using the terminal with the following line:(if you don´t have the CocadPods installed you can do it entering here)
pod init
–After that we open our “Podfile” (I used “vi”) and add the following lines to the document:
pod ‘Firebase/Core’
pod ‘Firebase/Analytics’ (This line is to add Analytics functionality implement Firebase to our app is not necessary for only Firebase)
pod ‘Firebase/AdMob’ (This line is to add Admob functionality implement Firebase to our app is not necessary for only Firebase)
-Exit from the file and use one last command:
pod install
-Now you can close the terminal and go to your project executing the “.xcworkspace” file created in your project’s folder.
Once you are back to your project go to the “AppDelagate” file and import and start the Firebase object:
After we add those lines to our Android project we will have FireBase setup and ready to be used in our app (The last step on the page is to verify that the app is connected to the Firebase console).
Implement Firebase Admob
To start using Admob you will new some requirements:
- First is have an Firebase project and an app connected to it.
- An Admob account and register an app.
- Link the Firebase app to the Admob account.
So you already have done the first step, leading you to the second step.
– To create an Admob account you will need to go to the official website, and sign up with one of your Google accounts and fill the small forms.
Once the account is set up, the next step is to register and app, we can do taht going to the Application’s Tab
– Fill the all the information that it ask you and then it will ask you to create an add unit you can leave for later once we prepare our app and we know how many and the different types of advertisements we are going to use.
For the last step you now need to link your app from the Firebase project you created to your Admob app to do that, once you are in your Admob app, go to the App settings and in the Firebase section select “Link to Firebase” and complete the form with the bundle ID of your app, then select the project of Firebase and everything will be linked now.
Now you have all the requirements to place ads in your application.
So first you need to declare our Admob application from where it will take the adds, to do that you have to create a new key in our Info.plist file, which it value is a String with the the AppID of your Admob’s project:
Now it’s turn to create an object to initialize our ads, this is GADMobileAds and you can do it like this:
Now you just have to place your ads, you have create a unit in our Admob project and then select the type of advertisement you want and follow the steps to create it. In this case I will show you how to create a banner.
To create a banner, create a View element in your storyboard and change its class to GADBannerView.
And to post the advertisiment that we create we have to stance our BannerView in the Viewcontroller and in the “viewonLoad()” function insert our unitID of our Admob unit like this:
So finally your advertisements are finally posted in your app, so this is it.
But as I mentioned there are more different types of ads that we can publish in our application, and you can learn our to use them, using the guide in Firebase official website.
NOTE
If you install AdMob pod at the beginning, you need to implement AdMob in your project from the beginning. This includes adding the Admob functionality to AppDelegate and adding the AdMob key to info.plist


