JAVA GAME-MAKING TUTORIAL
THE FLOWER-CATCHING BEE GAME
The following tutorial will teach you how to create a game using Greenfoot IDE (Integrated Development Environment).
STEP 1 – CREATING A NEW GREENFOOT SCENARIO
- Launch Greenfoot
- Click on “Scenario” –> add a “New Java Scenario”
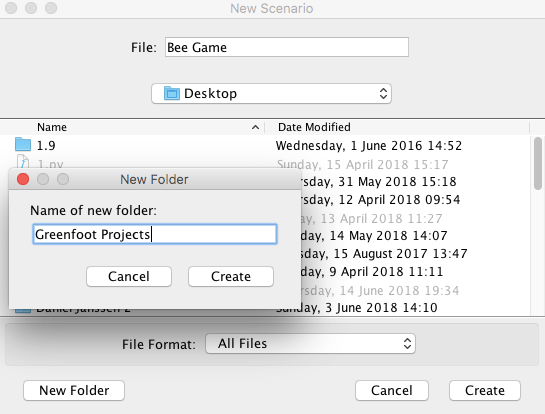
- Name the file and choose where to save it (existing folder or new folder)
STEP 2 – NEW GREENFOOT SCENARIO CREATED
Now you will see your new scenario, which includes two classes and a subclass by default:
- World and the subclass My World
- Actor
Each class we are going to create will be a subclass of the above classes and will inherit from them.
STEP 3 – ADDING BACKGROUND IMAGE TO MY WORLD SUBCLASS
- Right click on “My World” subclass and click on “Set image”
-
First option: you can add the background by choosing it among Greenfoot backgrounds
-
Second option: click on the settings on the bottom left side and click on “Import from file…”. Select the image you want as background.
- NOTE:
- It’s important that your image has exactly the same size of My World. Double click on My World to check its size.
- Adjust background image size to my world size: in the project folder find the folder “Images”, open your background image and then click on “Tools” and “Adjust Size”. Change its size to make it equal to My World size.
STEP 4 – CREATING A SUBCLASS OF THE ACTOR
Now we are going to create a subclass of the Actor, which will inherit all the methods from the Actor Class.
- Right click on “Actor”
- Click on “New Subclass”
- In the section “nature”, select the image “bee”
- Name your class as “Bee”
Note:
Remember that all classes should start with capital letters.
STEP 5 – ADDING AN INSTANCE OF THE BEE SUBCLASS TO MY WORLD
We created the subclass “Bee” and now we will add an instance of this subclass to make it visible on the background.
- Double click on “My World”
- Add the code:
addObject(new Bee(),200,100);
- Always click on “Compile” to save the changes
- Run your program
STEP 6 – MAKING THE BEE MOVE
- Double click on “Bee” and add the following blocks of code in the Act Method:
- To make the bee move straight forward:
move(5)
- To make the bee turn when it hits the edges:
   if (isAtEdge())
   {
         turn(17);
} - To make the bee move right and left:
   if (Greenfoot.isKeyDown("left"))
   {
          turn(-4);
   }
   if (Greenfoot.isKeyDown("right"))
   {
         turn(4);
   }
Another possible option to add the moves of the bee is to add these blocks of code outside the Act Method, that is creating those methods separately and calling them in the Act Method (see demo game).
STEP 7 – ADDING THE FLOWER SUBCLASS
- As we did for the Bee, right click on Actor and click on “New Subclass”
- Click on the nature section and select “Flower2”
- Name your subclass as “Flower”
STEP 8 – ADDING INSTANCES OF FLOWER SUBCLASS TO MY WORLD
- Double click on My World
- You can add the instances of the flower subclass in two different ways:
        Flower flo = new Flower();
        addObject(flo,400,100);
or, as we did before for the Bee,
        addObject(new Flower(),150,250);
        addObject(new Flower(),250,100);
        addObject(new Flower(),500,400);
        addObject(new Flower(),650,80);
        addObject(new Flower(),50,450);
STEP 9 – ADD THE METHOD FOR MAKING THE FLOWERS DISAPPEAR
Now we have one Bee moving and 6 Flowers. We will make the flowers disappear when the Bee eats them.
- Double click on “Bee”
- Add the following method outside the Act Method:
         public void checkCollision()
         {
                if(isTouching(Flower.class))
               {
                      removeTouching(Flower.class);
               }
}- call the method in the Act Method:
public void act()
{
      move(5);
      turnAtEdge();
      keyPressed();
     checkCollision();
}
STEP 10 – ADDING THE SCORE
Now will add a visible score section on the top left side of the background to show the user how many flowers have been eaten progressively.
- double click on “Bee”
- first of all, create an int variable called “flowersEaten” at the top, outside the Act Method, and state its value when the game starts, that is 0 (no flowers have been eaten yet).
int flowersEaten = 0
- add the following code to the checkCollision Method, after removeTouching(Flower.class), to make the number of flowers eaten increase by one every time the bee eats a new flower
flowersEaten+=1;
- now we will add the score section to track how many flowers the bee has eaten:
          MyWorld mw = (MyWorld)getWorld();
          mw.showText("Score is: " + flowersEaten, 70,20);
NOTE:
showText is a method included in the World, so the class Actor doesn’t include it by default. If we want to add the code for the score inside the “Bee” section, first of all we have to call the method from the World ( MyWorld mw = (MyWorld)getWorld();).
Then we can use the method to add the string and the position of the score label.
STEP 11 – ADDING THE CODE TO MAKE THE BEE STOP WHEN IT REACHES A SET OBJECTIVE
- Double click on “Bee”
- Add the following code to make the bee stop when it eats 4 flowers. The code must be included in the checkCollision method.
         if(flowersEaten == 4)
         {
              Greenfoot.stop();
         }
STEP 12 – CREATING THE CACTUS SUBCLASS
- Right click on “Actor”
- In the section “nature”, select the image “Cactus”
- Name the object as “Cactus”
STEP 13 – MAKING THE BEE DISAPPEAR IF IT TOUCHES THE CACTUS
- Double click on “Cactus”
- Add the code inside the Act Method to make the bee disappear when it hits the cactus:
if(isTouching(Bee.class))
{
       removeTouching(Bee.class);
}


